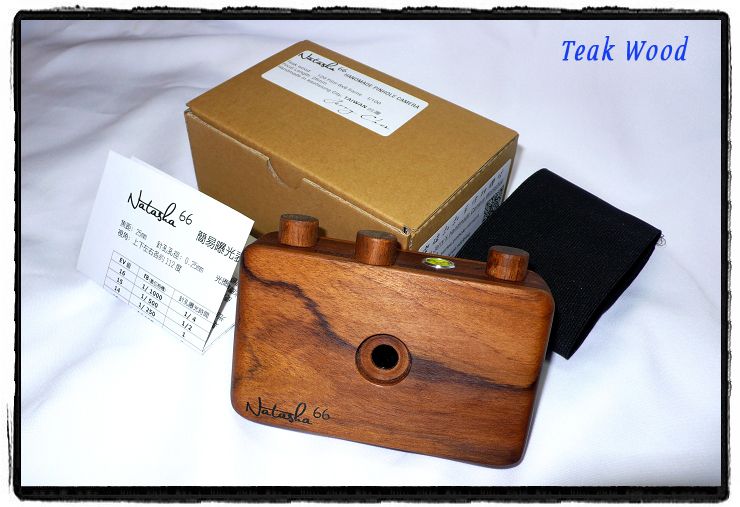
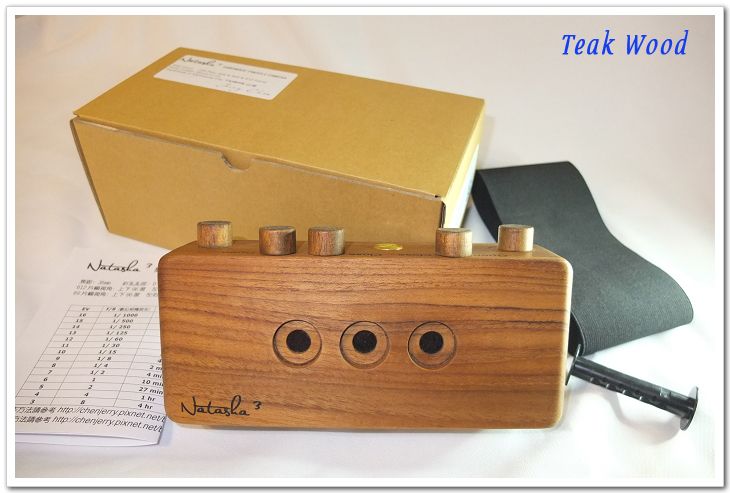
因為手工製作需時間, 也挺累人的~所以並沒有辦法在短時間內滿足所有想要擁有的孔友們!
若你想要擁有一台傑瑞手工製作的實木針孔相機! 請在此留言訂製
從你留言訂製起, 約15個工作天可以製作完成!! (因為我也是下班抽空製作啊)
完成後~會以Email的方式聯絡你!

注意: 由於是手工製作~所以難免會有手工痕跡及不完美之處!
完美主義很重的人...請考慮清楚再下訂!


請在留言時註明你要的規格,
並留下你的聯絡Email
或直接MAIL至chenjerry@kimo.com
謝謝!!  


相機規格如下


Natasha 66 - 2500元
  

焦距:27mm
水平視角108度, 垂直視角108度, 使用120底片, 可拍12張
66片幅, 曝光面積5.5cm x 5.5cm

Natasha 135 - 2500元
焦距:25mm  
垂直視角68度, 水平視角130度, 使用135底片, 可拍約22張
超寬片幅, 曝光面積2.4cm x 6.8cm

Natasha 69 - 3000元 

焦距:30mm   f/100
66片幅時垂直視角105度, 水平視角105度
69片幅時垂直視角105度, 水平視角125度
使用120底片, 可拍12張66或8張69

Natasha 612 - 3500元

焦距:35mm   f/115
69片幅時垂直視角96度, 水平視角118度
612片幅時垂直視角96度, 水平視角135度
使用120底片, 可拍八張69或六張612, 超寬片幅
美國攝影師Amy Hildebrand也擁有一台手工柚木6x6針孔相機
下圖為Amy Hildebrand的女兒與上圖中間那台相機的合照
Amy Hildebrand 簡介
http://article.dcview.com/newreadarticle.php?type=7&id=10618
66拍攝範例


135拍攝範例


傑瑞叔叔 發表在 痞客邦 留言(1) 人氣()


All camera can be set up on a tripod.
All my cameras are handmade, so there will be some marks(Scratches)at the camera. Considering before you make an order.

I only make camera 1 to 2 hours a day from Monday to Friday. So it normally takes me about 7 to 10 business days to finished 1 or 2 cameras.
Natasha 6x6 frame USD$90
Focal length: 25mm   f=100(estimate)  
Horizontal angle of view: 112° Vertical angle of view: 112°
Format of light-sensitive material: 5.5cm x 5.5cm
Can be make by using Teak wood or Crpress

傑瑞叔叔 發表在 痞客邦 留言(0) 人氣()

管杯杯的磨針孔片的文章不見了!! 剛好我一直想要寫一篇自己磨針孔片的方法
所以~今天看德國對阿根廷比賽時! 順便磨了幾片針孔!也把過程拍了起來! 
跟大家分享一下!!! 首先, 先喝一罐台灣啤酒!! 然後把鋁罐剪成3X3cm的正方型


剪一小張砂紙, 我是用顆粒150的


開始磨


傑瑞都是磨一個X, 這樣中間交疊部份會很快變薄


換磨另一面


也是磨一個X


磨到你覺得鋁片變比較薄時, 改拿在手上磨, 把食指當底, 用姆指和中間夾住來磨! 
因為這時鋁片較薄, 若不小心在鋁片下壓到小顆料,  很快的, 鋁片就會破洞了


磨好後, 左右掰動鋁片, 中間薄的地方會剝剝剝的~也可以看的出來很薄


這時你的手會沾滿了鋁粉, 先放下鋁片去洗手!


洗手時順便把鋁片也洗乾淨, 擦乾後找一根你所能找到最細的針


輕輕地在中間最薄的地方戳一下, 千萬不要用力, 不然孔一定會很大!


這時鋁片後方針戳的地方會有突起


把它磨掉


再把針輕輕地放到針孔洞裡~輕輕地轉一轉!!

再把鋁片兩面塗黑


再用針輕輕地放到針孔洞裡~輕輕地轉一轉!!


就得到了一個很完美的針孔了!!! 大家加油!!

用顯微鏡來看, 很圓就ok了!!

傑瑞叔叔 發表在 痞客邦 留言(0) 人氣()

針孔相機粉絲專頁: https://www.facebook.com/NatashaPinholeCamera

傑瑞叔叔 發表在 痞客邦 留言(0) 人氣()

Some of my camera’s horizontal angle is over 130 degrees.
Such as Natasha 69, 612, 618(617) and Natasha 45 with focus length lower than 35 millimeters.
You would find it has dark corners on the photos like these photos.


That is not what you want it happened, isn’t it?
Let me show you how to get average exposure by using Natasha pinhole camera.
I use a black card to get average exposure,
it is a round black plastic taped on a black stick.


Assume we got 12EV from light meter, by following the exposure timetable.
We need to exposure for 2 seconds, but also 4 seconds for the black card.

So, I will open the shutter for 2 seconds and then put the black card in front of
the pinhole for 4 seconds. Remember to move the black card like this video.
If you can not watch this video on this page, please click this link
https://www.youtube.com/watch?v=TGC6lRc-85I

傑瑞叔叔 發表在 痞客邦 留言(0) 人氣()

傑瑞叔叔製作的針孔相機有些水平視角都超過130度
像是Natasha
69, 612, 618, 三眼獸以及焦段在35mm以下的Natasha 45
你可以發現拍出來的照片都有四邊角失光, 造成暗角過大的問題!!


這時候傑瑞叔叔會拿出口袋裡的黑色棒棒糖來控制底片中央曝光的時間!
這是用在手工料行買的直徑2公分的塑膠片, 然後貼在一根吃鹹酥雞的竹籤上!
孔友們, 你們也可以用黑色卡紙剪一個直徑約2公分的圓即可~

 假設我們使用測光表得到了12EV, 參考簡易曝光表上的時間(抱歉是英文版的圖片)
那麼曝光時間就是2秒, 但如果2秒後就關上快門你就會得到一張邊角失光的照片

所以這時要再多增加4秒的黑卡時間, 也就是擋住中央的進光, 使四個邊角的曝光能夠足夠
因此, 在打開快門2秒後, 就立刻把黑色棒棒糖放在針孔的正前方約2~3公分處

並如同影片裡一樣的搖晃你手中的黑色棒棒糖4秒鐘!!!
若看不到影片請點此網址 https://www.youtube.com/watch?v=TGC6lRc-85I
這時四邊角也已經得到了充足的曝光量, 所以直接用棒棒糖把針孔蓋住來停止曝光
然後就可以把快門關起來了!!!

傑瑞叔叔 發表在 痞客邦 留言(0) 人氣()


6/1~6/30
傑瑞叔叔攝影展, 在高雄誠品書店(大立精品店)
6/1 早上十點半~晚上八點, 傑瑞會待在誠品看書進修
6/2 下午一點~晚上八點, 傑瑞會待在誠品看書進修
有來看展的朋友, 記得CALL我或LINE我~我會全程陪看!!

傑瑞叔叔 發表在 痞客邦 留言(0) 人氣()


上圖為2015年新版三眼獸(柚木)
下面示範相機為2013年的舊版三眼獸 
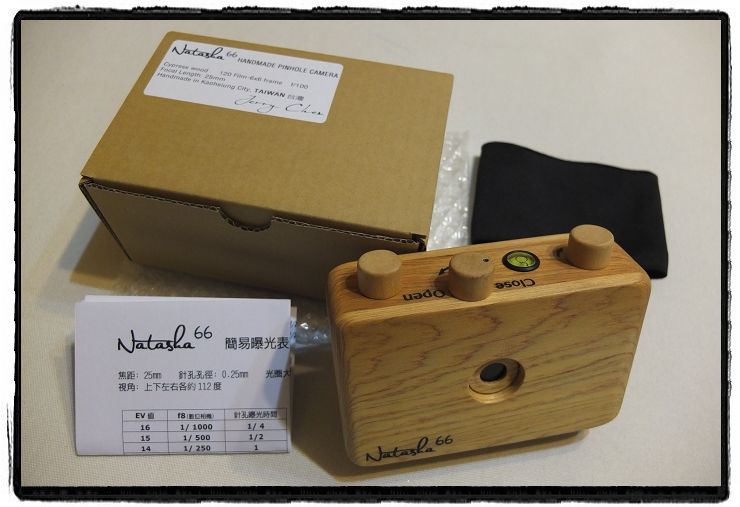
Presentation with 2013 old version "Natasha 3" camera
訂價: 4800元(不分木頭種類)   price: US$170

相機尺寸: 高9.6公分(含旋鈕), 寬20公分, 厚4.5公分
Camera size: Height 9.6cm (included knob), Width 20cm, Depth 4.5cm
介紹 introduction
當打開相機背板, 會看到有三小塊木頭隔板
When you open the camera back, there are three small wood panels.
拿開三片隔板, 就是一台612片幅針孔相機了
Remove all three panels, it becomes a  6x12 frame pinhole camera.
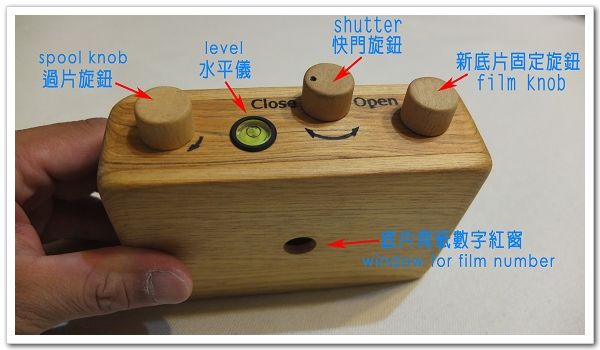
在這個模式時, 必須觀看標示6x12小紅窗來得知拍到第幾張照片了!
In this mode, you need to see the 6x12 small red window the know which number of film you are going to take.
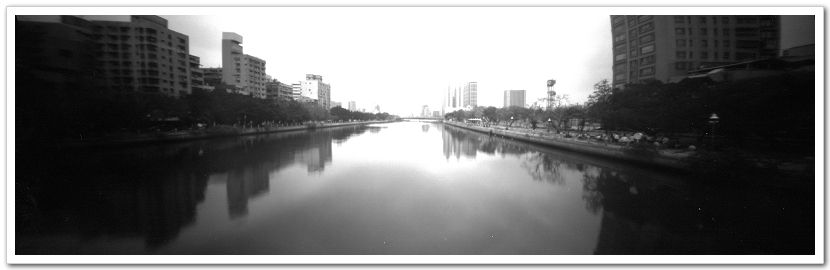
這時打開中央的快門, 就可以得到一張6x12照片
Open the center shutter, you can get a 6x12 frame photo
Example
但如果這時於兩個不同的地點打開兩側的快門, 就會得到以下的照片
but if you choose to open the shutters on the sides in different place, you would get pictures like below
Example
當然你也可以選擇在同一個地點打開兩側的快門
Of cause you also can open the shutters at the same time
把兩側的隔板插進插槽裡, 這時就變成一台6x9片幅針孔相機了! 在這個模式時, 只能打開中央的快門!
Put two side panels into the camera, you can get a 6x9 frame pinhole camera, but you can only open
the center shutter.
在這個模式時, 必須觀看標示6x9小紅窗來得知拍到第幾張照片了!
In this mode, you need to see the 6x9 small red window the know which number of film you are going to take.
Example
把中央的隔板插進插槽裡, 這時就變成一台有兩個6x6片幅針孔相機了! 在這個模式時, 不能打開中央的快門!
Put two side panels into the camera, you can get a double 6x6 frame pinhole camera, but you can not open
the center shutter.
你可以在不同地方打開快門, 得到的當然就是一張一張獨立的66片幅照片!
You can open the shutters in the different place to get individual 6x6 frame picture.
或者你也可以在同一個地方拍攝, 然後再用軟體把左右互調, 得到一個類3D的效果
Or you can shoot both 6x6 frame at the same time, and the use software to move the
left side picture to the right to get a 3D like picture.
注意: 在打開相機背板時, 只能由下方開啟, 若從上方開始時, 右側固定片軸的小板腳會被折斷
Caution: when opening the camera back, please open it from the bottom ! If you try to open it from the top,
the small board at the left side on the backboard would be broken.

傑瑞叔叔 發表在 痞客邦 留言(0) 人氣()


由於Natasha系列針孔相機是採用實木製造
而後蓋又是6mm的薄板!
注意~問題來囉!!
實木薄板最大的一個問題就是........容易變形
是會前翹後凸還是左彎右彎的! 不一定! (45針孔無變形問題)
所以在此提醒擁有Natasha系列針孔相機的朋友們!!
當相機沒有在使用的時候, 用兩條以上的橡皮筋, 纏繞兩圈至三圈來綁住
Because Natasha series pinhole cameras are made by solid wood
and the back board is a 6mm sheet wood
Attention~There is a problem!!
Sheet wood back board have a problem, that it might deformed.
The back board might twisted and causes leakage of light.
So, when you are not using it, I suggest to use rubber band to tie the back board with the body.

傑瑞叔叔 發表在 痞客邦 留言(0) 人氣()


How to use 120 system pinhole cameras (6x6, 6x9, 6x12, 6x18)
(use 4x5 pinhole camera please move to "How to take a photograph" below )

Recently I've found out that many my customers have never used 120 system camera.

So, I wrote this article to show you how to use my pinhole camera.
This article is about 120 system camera, please check this link for 135 camera
http://chenjerry.pixnet.net/blog/post/121541876

120系列針孔相機的使用&拍攝方法
(6x6.6x9.6x12.6x18都相同)
(使用45針孔請直接跳至下方拍攝方法)

最近有比較多朋友剛接觸到針孔相機
更有許多朋友是從來沒有接觸過底片的~所以傑瑞叔叔決定打一篇新的教學!!
在此以120底片系列的相機來做的示範~
135的裝片方法請看 http://chenjerry.pixnet.net/blog/post/121540283 ,拍攝方法與本篇的120相同
示範相機為2014年的新版6x6相機 Presentation with 2014 new version 6x6 camera

1.裝底片前請先確定快門旋鈕是在關閉的位置!
Make sure the shutter is closed before you load the film.

傑瑞叔叔 發表在 痞客邦 留言(0) 人氣()

I hope you can understand what I tried to say, because my English is so poor.
First, you need an empty film roll, and of cause a new film
 
Cut the front end of the new film
Use adhesive tape to tape the empty roll and new film together.
Gently to pull up the knob, the empty film roll will be set.

Put the empty film roll into the left side camera.

Load the new film into the right side

Remember the click device must inside a film hole. Otherwise you wont hear the click sound.
And please do not use your finger to play the click device, is it not very strong.

Replace the camera back

please follow the direction to turn the film and open the shutter.
After the film is loaded, turn the knob for 18 clicks, then the first photo is ready to be shot.
And then, turn the knob for 16 clicks for the next photo. You can take about 22 to 24 pictures.

After about 22 to 24 shots, you will find the knob is not able to turn anymore.
That means you have finish this film. You have two ways to take the film out of camera.
1. Open the camera back and take out the film, in this case, you will lost the last photo.

2. Open the camera back in a darkroom or darkrrom bag, and turn all film into the film roll.
    so the last photo will be saved.


Take the film out of the camera, it is ready to development.

傑瑞叔叔 發表在 痞客邦 留言(0) 人氣()

由於135底片不像120底片有背紙數字可以看, 一般都是需要自動或手動過片機械系統的
所以在裝底片和過片上, 需要完全的土法錬鋼!!
在這裡講解裝片與過片, 以及拍完取片方法讓大家有個概念
首先, 你必需準備一個135空片殼, 最好是跟你要使用的底片一樣的! 直接跟相館索取即可
將新的底片的片頭剪掉
用膠帶將兩端黏緊
將空片殼放在左邊的底片室

將過片軸拉起, 將過片桿插入片殼裡

將新底片放置在右邊的底片室

底片放好後, 請注意底片齒孔必須套在過片彈片上, 才能在過片時聽到彈片的喀喀聲

確定齒孔在彈片上後, 就可以蓋上後蓋了

拍攝時注意過片方向以及快門的旋轉方向
裝上底片後, 轉動最左邊的過片旋鈕就會聽到彈片的喀喀聲, 一開始聽到18聲響就可以拍第一張了,
之後每16聲響為下一張, 約可拍22張!

拍完後, 直接打開背板, 剪掉底片, 只不過最後一張照片就因為曝光而損失了!

或者你可以在暗房或暗袋裡將背板打開, 將底片都旋進片殼裡, 再將底片剪斷, 這樣最後一張照片也就保存下來了
大功告成~可以送相館沖片了!!

Natasha 135 規格如下:
1. 25mm(指針孔到底片的最短距離)
2. 片幅為24mm x 68mm 超寬幅 (含齒孔為35mm x 68mm), 單一片幅, 不能改變
3. 使用聽聲辨位法, 塑膠片是內建在相機裡
4. 外型和Natasha 120一模一樣, 只是高度只有一半多一點, 長度多1.5公分!

缺點:

1. 聽聲辨位法,也許會有失誤, 如齒孔走位,單次兩響或無響音, 造成過片誤差,而有浪費底片或疊片的情形
2. 拍完後, 若直接打開背板剪片的話, 最後一張就完蛋了! 所以要嘛損失最後一張, 不然就要帶暗袋出門了
優點:
1. 尺寸小, 方便攜帶
2. 135底片約可以拍24張左右, 較適合覺得120貴的朋友!

傑瑞叔叔 發表在 痞客邦 留言(0) 人氣()

1 2
Blog Stats
⚠️

成人內容提醒

本部落格內容僅限年滿十八歲者瀏覽。
若您未滿十八歲,請立即離開。

已滿十八歲者,亦請勿將內容提供給未成年人士。